
Customer Care
Itinerary
Ad Hocs
How to create an itinerary
Once a file is in CH, Customer Care needs to create the technical itinerary in order for Operations to start booking the visits and lunches as necessary.
1. Link the PCM
When receiving a file, the Groupbook reference will only have accommodation services inserted. You will need to link the PCM in order to have all services included in the package price inserted.
You will find the PCM name in the E-File, under the Offer Recap Tab.

To link, click on the PCM tab of your Group, then Insert PCM.
Copy your PCM name at the Top, and then change the sequence you want the tour to start at. For example 1/10 if your first service is a Coach.
Select MERGE PCM WITH and save!
NOTE: It is very important to select Merge the PCM, and NOT insert!!

Once the PCM is linked, you can go back to your service list and delete any duplicate General lines, such as the accommodation ones.
To delete a service, select the line and click delete at the top of your Groupbook.
NOTE: Be careful to delete duplicates ONLY!

2. Offer Recap
Now that your PCM is linked, you should read the offer and client’s program to check that TP and the itinerary quoted match. You will find both hyperlinked here:

You will also find the supplements taken by the agent in the "Offer Recap" (see above).
If the client has confirmed supplements, you will need to insert them in the group booking. Supplements are inserted in a 2nd itinerary as they will be charged extra to the package price.
First, you will need to create a 2nd itinerary in "Pax Configuration" and update the pax numbers as necessary. Rename your 2 itineraries as required.

You will now need to insert any supplement accepted by the client as per below.
First click insert at the top of your group book.

You will then need to select the service you want inserted in the booking.
Click "Scroll Services" and double click on the line you need.

All that is left to do is click "Save" at the top of your group book.

NOTE: Make sure the supplement is inserted in the correct itinerary. You can check that before saving the line, or afterwards in the Service details tab.

Finally read the conversation between BD and the agents and note any details to remember! This is also when you can take note if you need the flight details, or the client’s program or any other info necessary.
The conversation is saved in TP under the "Package" itinerary and then "Agent":

You can take note of any details in the "Booking Notes" under "C&C Note". This will then appear in your planning automatically.

3. Timings
The next step to create the itinerary is to insert a time to all services that need pre-booking.
You will also need to choose and insert all lunches with a time.
Your Group booking will only have 1 General line for X amount of lunches. You can delete that line and insert the chosen lunch venue for each day.
NOTE: You can find a list of lunch venues here: file:///N:\Groups%20-%201st%20Floor\Operations%20Department\Shared%20Information\Lunches\Lunch%20Venues%20report%20-%20%20Menus%20&%20Rates%20-%20Ireland.xlsx
Take your tour day by day and map the itinerary; you can use Google Maps to have an idea of timings and distances.
NOTE: Usually add around 15 min on the Google Maps time to plan for a bigger group and bus.
Insert times for lunches and visits in "Pick Up/Drop Off" in TP:

NOTE: Make sure that you have the correct amount of lunches at the end so you are not missing one!
4. Issuing the itinerary
Once your itinerary is planned and timed you will need to issue a Word Document and save it on the Ndrive. This will be referred to as your Technical Itinerary and will be used by guides and drivers during the tour as a reference.
You will issue your itinerary from TP using the "Documentation" tab, "itinerary" and the code TEGT, click "File" and "Save":

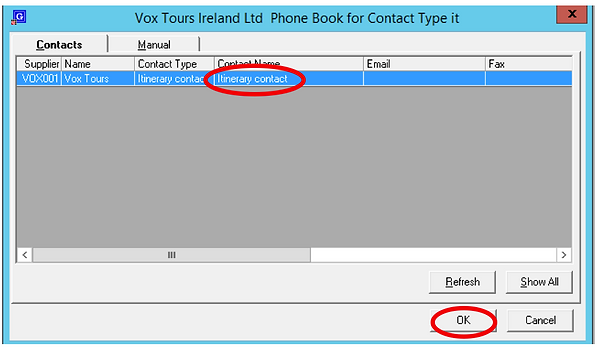
A few Pop Up Windows will appear for each service inserted in TP. You will need to select the “Itinerary Contact” twice so that the phone number appears on the Word Document.

Finally save the document here under the correct Year, Month and Reference Number: N:\Itineraries\2019
5. Editing the Itinerary
Your job is almost done: the last step is to Edit the itinerary! So open your Word Document.
The format should always be A4, Landscape, 2 Columns. This can be changed in the “Page Layout” tab.

The 1st page is a template that you will need to update according to what is required. See below highlighted in yellow all info to be filled at this stage:

The actual itinerary will start on the 2nd page. Here again some editing is needed.
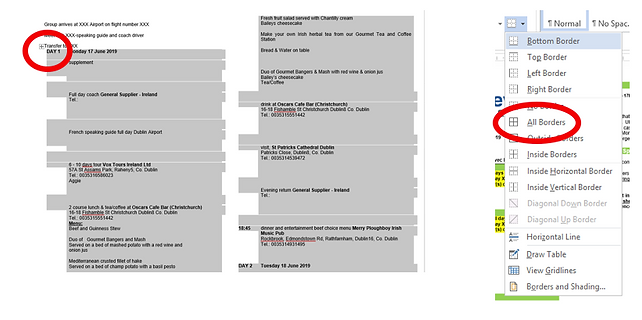
1st: The itinerary is in a table mode but lines do not show. You should insert the lines to make it easier to amend. Select the table and then select “All lines” at the top.

2nd: You will then need to insert the 3 first lines of the 2nd page in the table under day 1, and the 3 last lines in the last day:


3rd: Finally you will need to edit the itinerary by deleting any empty table lines, have space between services and inserting general comments on the itinerary, for example a day in Connemara should look like:

Once the entire itinerary has been formatted to the proper format, save it and go back in your "Header Details", "Itinerary Status" to IU. Group booking. You will need to change your “Header Details”, “Itinerary Status” to IU.
This way, Operations can start booking all services at the time requested.

Series
For the series itineraries, we would proceed a bit differently.
We would follow the same process as the ad hocs itinerary but update the lines on the PCM and not the Groupbook.
This way, we will have all the accurate information first and not have to update every single bookings.
When BD send you a series handover, they will give you the name of the PCM to use.
You will need to copy this PCM for this you need to go to your PCM and then copy PCM.

Change the name of the PCM the account handler and tick Copy PCM notes and save.

Now that your PCM is copied, you will have to update line and PU/DO as per offer and program brochure.
You can find all details and conversations in Notes/ Agent notes/ Series

The next step is to update your PCM is to insert a time to all services that need pre-booking.
You will also need to choose and insert all lunches with a time.
Your PCM will only have 1 General line for X amount of lunches.
You can delete that line and insert the chosen lunch venue for each day.
NOTE: You can find a list of lunch venues here: file:///N:\Groups%20-%201st%20Floor\Operations%20Department\Shared%20Information\Lunches\Lunch%20Venues%20report%20-%20%20Menus%20&%20Rates%20-%20Ireland.xlsx
Take your tour day by day and map the itinerary; you can use Google Maps to have an idea of timings and distances.
NOTE: Usually add around 15 min on the Google Maps time to plan for a bigger group and bus.
Insert times for lunches and visits in "Pick Up / Drop Off" in TP:

NOTE: Make sure that you have the correct amount of lunches at the end so you are not missing one !!
You can also add blank notes in order to fill in your word itinerary
For this you will have to use the supplier NOT001 and the option code BLANK and SAVE. You then, will have to put your notes in itinerary note

You then, will have to put your notes in itinerary note

Once you are happy that your PCM is updated to the fullest, you can now go in your first group book and merge the PCM
To link, click on the PCM tab of your Group, then Insert PCM.
Copy your PCM name at the Top, and then change the sequence you want the tour to start at. For example 1/10 if your first service is a Coach.
Select MERGE PCM WITH and save!
NOTE: It is very important to select Merge the PCM, and NOT insert!

Now you’ll have to edit your 1st itinerary
Once your itinerary is planned and timed you will need to issue a Word Document and save it on the Ndrive. This will be referred to as your Technical Itinerary and will be used by guides and drivers during the tour as a reference.
You will issue your itinerary from TP using the “Documentation” tab, “Itinerary” and the code TEGT, click “File” and “Save”:

A few Pop Up Windows will appear for each service inserted in TP. You will need to select the “Itinerary Contact” twice so that the phone number appears on the Word Document.
Finally save the document here under the correct Year, Month and Reference Number: N:\Itineraries\2019
1. Editing the Itinerary
Your job is almost done: the last step is to Edit the itinerary! So open your Word Document.
The format should always be A4, Landscape, 2 Columns. This can be changed in the “Page Layout” tab.

The 1st page is a template that you will need to update according to what is required. See below highlighted in yellow all info to be filled at this stage:

The actual itinerary will start on the 2nd page. Here again some editing is needed.
1st : The itinerary is in a table mode but lines do not show. You should insert the lines to make it easier to amend. Select the table and then select “All lines” at the top.
2nd: You will then need to insert the 3 first lines of the 2nd page in the table under day 1, and the 3 last lines in the last day:


3rd: Finally you will need to edit the itinerary by deleting any empty table lines, have space between services and inserting general comments on the itinerary, for example a day in Connemara should look like:

Once the entire itinerary has been format to the proper format, save it and go back in your Group booking. You will need to change your “Header Details”, “Itinerary Status” to IU.
The next step is to send the itinerary to ops so they can have a look before you link the entire series.
If they come back to you with changes you will have to go and make the change in the PCM you copied.
Once everybody is happy with the changes, you can go and link all the booking of your series and put the itinerary status in IU. You will have to edit them all and hyperlink them in Notes\ Package\ Itinerary

Nearly there the only thing left to do now is send a message queue to operation so they can start booking all the services.
Go to Message queue / Queue entry / Insert

Queue to Ops, type CCTB

One of the 1st step to handling a group is to create a technical itinerary. This document will be used by drivers and guides on the tours to know timings and visits included in the programme.
Video needed